The Doza Assist manual.
Start with the recommended workflow, then everything from first install to FCPXML round-trip and Share — the guide that ships with the app, updated here first. It covers Doza Assist and Doza Assist (Studio); anything only Studio does is marked Studio. Prefer paper? Download the PDF.
Doza Assist or Studio: what's in each
This guide covers both editions. Everything in Sections 1 to 18 works identically in Doza Assist (one-time purchase) and Doza Assist (Studio) (subscription). Studio adds one thing: hosted Share. Anything marked Studio needs a Studio or Enterprise key, or the Studio free trial.
| Doza Assist | Doza Assist (Studio) | |
|---|---|---|
| How you pay | $199 once. Yours forever; nothing renews. | $299 a year, or $29 a month. Cancel anytime. |
| The app (Sections 1 to 18) | Everything | Everything, identical |
| Updates | One year included, then $49/yr only if you want more; included free with any active Studio subscription. The app keeps working either way. | Every update while you subscribe. |
| Hosted Share (Section 19) | Not included | Included: send a link, collaborators pull selects and comment in a browser, everything syncs back to your project. |
| Documents on a share link | Not included | Transcript, selects and quote sheet as Word, PDF and Excel, downloadable by collaborators. |
| Collaborator AI access | Not included | Per link, a collaborator may connect their own assistant (Claude and other MCP clients) to the interview. |
| Machines | Your own Macs | One Mac at a time; free a seat from Manage License |
| Free trial | Every feature on the first 2 minutes of any file | The same, plus two share links with every Share feature |
| Download | doza.ai/download | doza.ai/download#studio, a separate app named "Doza Assist (Studio)" |
Enterprise is Studio for a team: one key, one seat per machine, invoiced yearly. Email [email protected].
01The Recommended Workflow
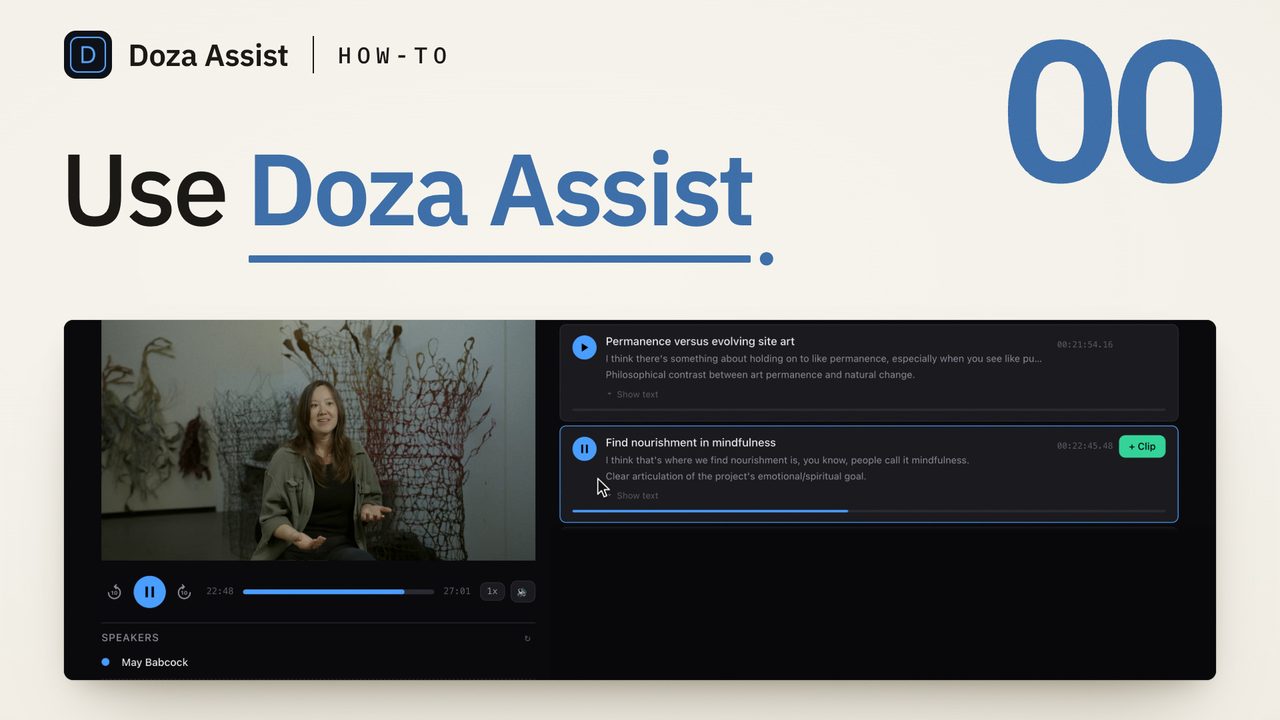
Doza Assist is built around the way documentary and interview editors already work: watch the footage, find the moments, shape the story. The first pass takes minutes instead of days, but the order still matters. The tabs on every project run left to right in the order of work: Transcript, AI Analysis, Chat, Story Brief, Story Builder, Clips, Export. Follow them across and you have made the film.
| Step | What you do | Why it comes here |
|---|---|---|
| 1. Create & transcribe | Drop the file (or an FCPXML from Final Cut or Resolve), leave Language on Auto-detect, name the project, transcribe. | Minutes. Everything else reads this transcript. |
| 2. Transcript: check it | Read it through once. Name the speakers in the Speakers panel. Double-click any wrong word and fix it; split a paragraph where two people run together; give a line to the right speaker. | Five minutes here save a re-run of every step below. Speaker labels and wording flow into analysis, chat, clips and exports. |
| 3. AI Analysis | Run it once. Read the summary, soundbites, story beats and social clips. Add the ones you like to Clips. | This is what turns the app into an editorial partner. Saved to disk; you pay the cost once per project. |
| 4. Chat | Start with the five suggested questions. Tell it what you are making ("a 90-second teaser"). Pull clips from the cards; pass on the ones you do not want. | Chat leans on the analysis. Without it, Chat still works on the raw transcript, fine for lookups, weak for story. |
| 5. Story Brief | Build it when you want the producer's read: arcs, tensions, strongest moments, coverage gaps. | Optional on a quick job; essential when you are deciding how to cut, not just what. |
| 6. Story Builder | Describe the story with a length ("a 3-minute story about…"), drag clips in from Your Clips, rearrange, play it through. | Your rough-cut assistant. The duration is a real target, not a suggestion. |
| 7. Clips | Everything you pulled, in one place: titles, the first line, Show text, Trim to the word, drag to reorder, a quote sheet if you need one. | The order you set here is the order your export lands in. |
| 8. Export | Send a timeline to Final Cut, Resolve or Premiere, or write Word, PDF and Excel documents. | Timelines arrive named for the project and numbered, with the words of every select in its note. |
When you have more than one interview. Check two or more transcribed projects on the Projects page and click Create Collection. A collection has the same tabs as a project, and every tab works across all of its interviews at once: chat across them, a Story Brief that finds the connections between them, stories and exports that draw from any of them. Do steps 1 to 3 on each interview first, then work in the collection (Section 15).
When you want Claude in the loop. Switch on AI assistant access from a project's gear menu and Claude (on your Mac's Claude Desktop, Claude Code or a compatible editor) can read that project's transcript and selects, search it, and add its own selects to your Clips, clearly labeled. It is off by default and per project (Section 16).
Common wrong turns.
- Chatting before analyzing. Chat answers, but it is guessing at structure. Run Analysis first; it takes minutes and Chat gets sharper.
- Painting clips before speakers are right. Clips keep their timecodes when you fix the transcript, so nothing is lost, but the clip titles, notes and quote sheets read better when the names are right from the start.
- My Style on while exploring. Leave it off until you know the story you are chasing; then turn it on and it shapes which moments come back, not just how the answers read.
- Re-running Analysis by habit. Analysis is cached per transcript. Re-run it after real transcript corrections (the app says when) or after changing the AI model, not after every chat.
02System Requirements
Doza Assist runs entirely on your Mac. Nothing uploads to the cloud unless you choose to connect your own AI key. Your footage stays private, your style stays yours, and the craft stays in your hands. That local-first approach means the app needs real hardware to do its job.
| Requirement | Minimum | Recommended |
|---|---|---|
| macOS | Sequoia 15.0 | The current macOS |
| Chip | Apple Silicon (M1) | M2 Pro or newer |
| RAM | 16 GB | 32 GB+ |
| Free disk space | 15 GB | 25 GB+ |
| Internet | Required for first launch | For updates & cloud AI |
Intel Macs are not supported, and Doza Assist needs macOS 15 (Sequoia) or newer.
Disk space matters because the AI models are downloaded to your machine on first launch: the transcription engine (~2.3 GB) plus the balanced Gemma 4 4B local model (~6.6 GB) — about 9 GB total. If you connect your own Anthropic or OpenAI key instead, the local model matters far less (see Section 5).
You can switch to a larger or smaller local model at any time in AI Model; the new size downloads on first use:
| Model | Suggested RAM | Download size |
|---|---|---|
| Gemma 4 2B (e2b) | Under 16 GB | ~4.6 GB |
| Gemma 4 4B (e4b) — default | 16 to 32 GB | ~6.6 GB |
| Gemma 4 26B | 32 to 64 GB | ~18.7 GB |
| Gemma 4 31B | 64 GB+ | ~20.4 GB |
Downloads are resumable — if you quit mid-download, the app picks up where it left off on the next launch.
03Installation
Doza Assist is fully self-contained. Everything it needs — the transcription engines, the local AI runtime, the audio toolchain — ships inside the app. There is no Homebrew, no Terminal, no developer tools prompt, and nothing installed system-wide. First launch takes about 10 to 20 minutes, almost all of it downloading the AI models.
Step 1: Install the app
- Download the DMG from your purchase confirmation email or from doza.ai/download, then drag Doza Assist into Applications.
- The app is signed and notarized by Apple, so there are no Gatekeeper warnings.
Step 2: First launch
Launch from Applications, accept the Terms, and the app downloads its AI models: the transcription engine (~2.3 GB) and the Gemma 4 local model (~6.6 GB). The setup screen shows real progress for both, says in plain words what each download is for, counts the steps, and tells you the first start takes about a minute. There is nothing to configure. Models are stored in the app's own support folder (under ~/Library/Application Support/DozaAssist) and persist across updates.
Your own work is kept apart from the machinery: projects and every exported file live in ~/Documents/Doza Assist — a Projects folder, and an Exports folder that also holds your transcript documents and quote sheets. Because it is a normal Documents folder, it lands in Time Machine backups and syncs through iCloud Drive if your Documents folder does. macOS asks once for permission to use your Documents folder; if you decline, the app simply keeps working from its support folder. Updating from an older version moves your existing projects over automatically — nothing to re-import.
| Inside the app | What it does |
|---|---|
| Parakeet & Whisper engines | Word-level transcription, entirely on your Mac. |
| Local AI runtime | Runs the Gemma 4 model privately on your machine. |
| Audio engine (ffmpeg) | Extracts audio from your video files for transcription. |
| Speaker models | Power speaker diarization — no account or token needed. |
Step 3: Licensing
Enter the license key from your purchase email on first launch (internet required once), or choose Start free trial: every feature works on the first two minutes of each file until a key is entered, and buying later unlocks the app in place. A Doza Assist key is perpetual: cached locally, it keeps working offline and re-validates quietly whenever you're online. A Studio key Studio is a subscription: it validates the same way, runs on one Mac at a time, and unlocks hosted Share (Section 19) in Doza Assist (Studio); entered in plain Doza Assist it unlocks the app but not Share. If the subscription ends, a Studio key entered in plain Doza Assist pauses the app 14 days later until you renew. AI assistant access (Section 16) works in the trial on the two-minute trial transcripts.
04Your First Project
- Create a project. From the dashboard, drag a media file onto the drop zone, paste a path, or click Browse. Most professional video and audio formats are accepted, including broadcast camera files such as MXF, MP4, MOV, and MPEG-TS (.ts / .m2ts / .mts). Name it and fill in the optional details: Client, Interviewer, Subject, Number of Speakers (1 to 4), Language (Auto-detect listens to the first stretch of real speech and picks the right engine; or choose English or one of ~30 specific languages), and Output Language (the language the AI writes in — see Section 5). Every detail can be changed later from ⚙ → Project details, and ⚙ → Relink media finds a source file that has moved. Your file stays where it is; nothing is copied or uploaded.
- Or import from Final Cut or Resolve. Drop an FCPXML file or .fcpxmld bundle to start from an existing timeline, including multicam and sync-clip projects, without moving any media. See Section 17.
- Transcribe. The app transcribes on your Mac using NVIDIA Parakeet (primary) with WhisperX and Whisper as fallbacks across ~100 languages. The first non-English transcription downloads a one-time language component (~600 MB) automatically. Review the result in the Transcript tab: name the speakers and double-click any wrong word to fix it, before analysis. See Sections 6 and 7.
- Analyze. Run AI Analysis. This is the step that finds the story (Section 8).
- Build and export. Use Chat, Story Brief, Story Builder, Quote Sheets, or Clips to shape your selects, then export back to your NLE (Sections 10 to 18).
05Choosing Your AI: Local Models & Bring Your Own Key
Every AI feature (Analysis, Chat, Story Brief, Story Builder, Quote Sheets, My Style) runs through a provider you choose per project, in the project's gear menu under AI Model. Every project starts local. Nothing leaves your Mac until you say so, per project. You have three options:
- Local (Ollama): free, fully offline, runs the Gemma 4 model on your Mac. The privacy-first default.
- Anthropic (Claude): uses your own Anthropic API key. Faster and noticeably sharper writing than local.
- OpenAI (ChatGPT): uses your own OpenAI API key.
Local models (Gemma 4)
On first launch the app auto-selects a local model based on your Mac's RAM. Bigger models produce tighter phrasing and better structure; smaller models let you iterate faster. Change models anytime in the selector.
| Model | RAM needed | Speed (1 hr footage) | Best for |
|---|---|---|---|
| 2B (e2b) | Under 16 GB | ~15–20 min | First-pass exploration. Cheap to iterate. |
| 4B (e4b) | 16 to 32 GB | ~25–35 min | Day-to-day default. What most editors should use most of the time. |
| 26B | 32 to 64 GB | ~60–80 min | Final story drafts for client delivery. |
| 31B | 64 GB+ | ~90–120+ min | Hero deliverables. Best phrasing and structure. |
- Switching models does not auto-rerun analysis. If you change models mid-project, re-analyze to get the new output.
- One model per project at a time. Pick early and finish on it.
- When in doubt, start with 4B; climb to 26B or 31B only for the final pass on deliverables.
Cloud models: Bring Your Own API Key
If you want frontier-level writing and the fastest turnaround, connect your own Anthropic or OpenAI key. Doza Assist routes each task to the right tier automatically, so you only pay for the heavy model where it matters:
| Task | Anthropic (Claude) | OpenAI |
|---|---|---|
| Analysis, Story Brief, My Style | Opus 4.8 | GPT-5.4 |
| Chat, selects, everyday tasks | Sonnet 4.6 | GPT-5.4-mini |
Setting up a key:
- On the Projects page, click AI setup and paste your API key (from console.anthropic.com or platform.openai.com), click Save, then Test. Keys are saved once for the whole app; they do not change where any project runs.
- In a project, open the gear menu, click AI Model and choose the Anthropic or OpenAI tab. The first time a project leaves local, a dialog spells out what will be sent and asks you to confirm. Other projects stay local.
- Switch a project back to Local anytime. Your key stays saved for next time.
- Assistant access (letting Claude or another connected assistant read a project) is also per project, off by default, and asks for confirmation the first time you turn it on.
Output Language: write in any language
Separate from the spoken language of the interview, you choose the language Doza Assist writes in. Output Language governs every AI-generated text — Analysis, Chat, Story Brief, Story Builder, and Quote Sheets — across ~30 languages. Set it when you create a project, or anytime from ⚙ → Output Language on a project. The default, "Match interview language," keeps the app writing in whatever was spoken.
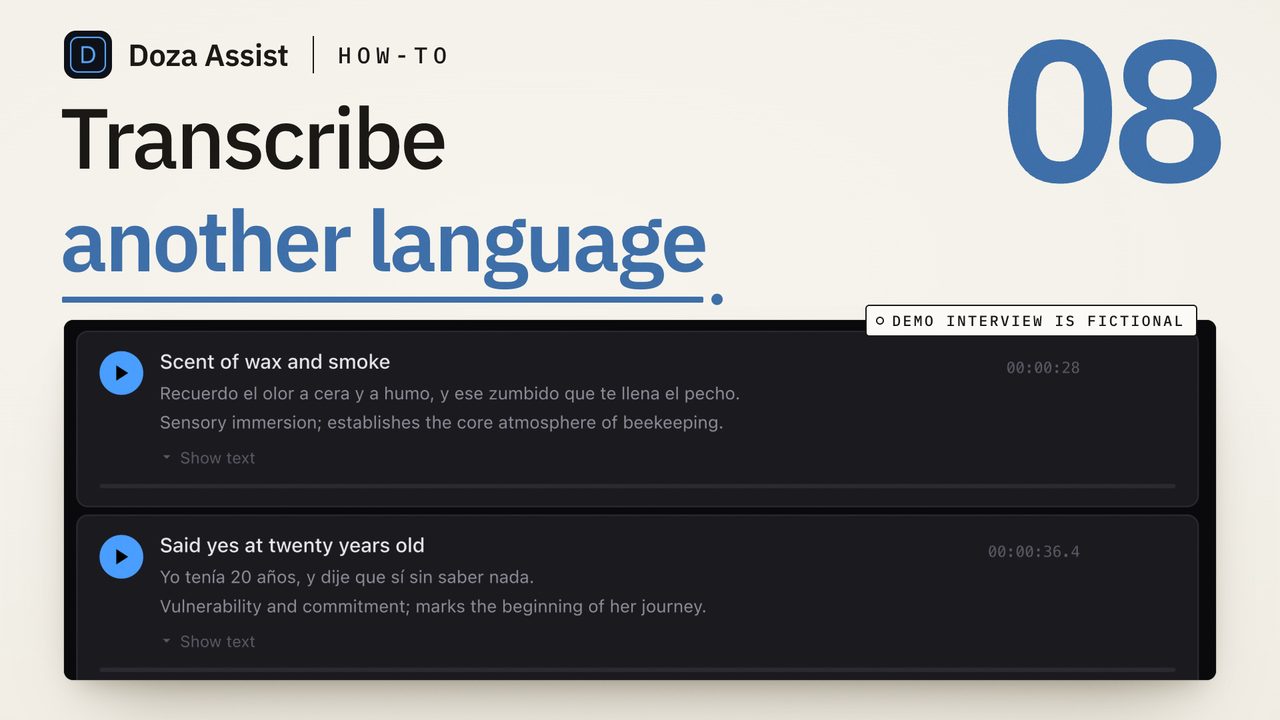
Your subjects' words are never rewritten: verbatim quotes always stay in the original spoken language, even when the surrounding analysis is in another. So you can transcribe a Norwegian interview, read its analysis and summaries in English, and have every pulled quote remain exactly as spoken. Collections inherit the Output Language of the interviews inside them.
The full list, the 30 languages Doza Assist writes in and the 70 more it transcribes with Auto-detect, is at doza.ai/languages.
06Transcription & Speaker Labels
Transcription converts your interview into a clickable, speaker-tagged, word-level transcript, entirely on your Mac. Click any line to jump the player to that moment.
Engines (auto-selected, fastest first)
- Parakeet MLX: fastest, English-only, tuned for Apple Silicon. Used automatically for English.
- WhisperX: used for non-English languages and as the next fallback; broad language support with word-level alignment.
- Whisper: final fallback (slower, more memory).
The progress indicator names the engine and shows a percentage. With Language on Auto-detect the app listens to the first stretch of real speech, identifies the language, and sends English to the fast engine, whether you add one file or a batch.
Very long recordings transcribe. A file of many hours (even 36) streams through the engine without running out of memory. Before you wait, the app warns when one project runs past 8 hours (4 hours for languages other than English) and suggests splitting it into shorter projects inside a Collection, and it warns when an FCPXML's source media adds up to more than twice its timeline, which usually means camera and recorder files were never synced. Both offer Continue anyway.
Multi-track audio & separate mics
When a source carries several separate audio tracks — a 4-track broadcast MXF, or discrete lav and boom mics on their own channels — Doza Assist detects the layout and transcribes the speech track for the cleanest, per-voice result. You can choose a different track two ways: the player's control bar has an Audio track dropdown to audition each one (the transcribed track is marked "• transcript"), and ⚙ → Retranscribe offers an Audio track selector to re-run on a single track or on all tracks mixed together.
Camera-original formats such as MXF and AVC-Intra play audio-first while the app builds a video preview in the background, then switch to full video automatically — so you can start reading and clicking the transcript right away instead of waiting on a proxy.
Speaker labels & diarization
Doza Assist tags who spoke when. Speaker identification runs in the background right after transcription, so you can keep working while it finishes; it picks up where it left off if the app restarts, and a Run speaker detection button appears in the Speakers panel for projects that never ran it. The speaker models ship inside the app: no account, token, or download required.
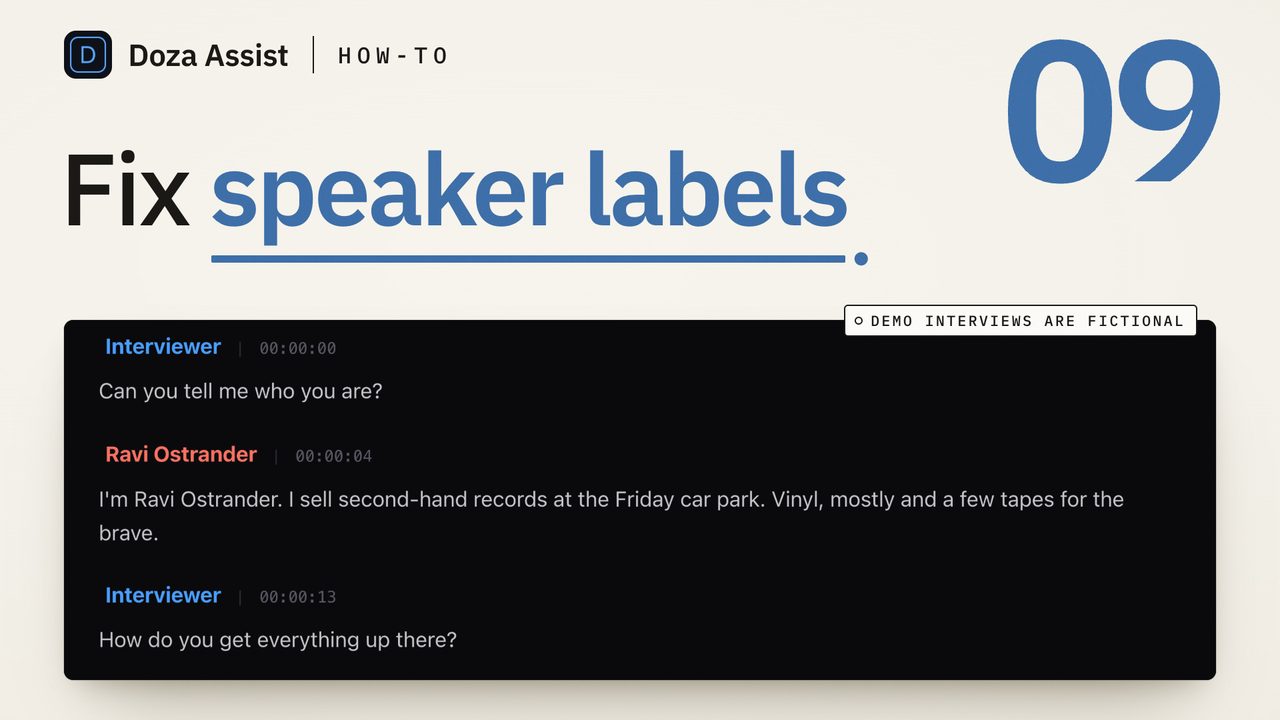
Names come from the transcript. Once speakers are identified, the app reads the interview for introductions and direct address and names the speakers it can, upgrading "Speaker 1" style labels to real names. Names are only ever taken from what is said; the app never invents a name or a description, and a name with a role reads like a lower third: James Casey, Superintendent of Schools. Each speaker gets a colored row in the left Speakers panel where you can rename anyone; renames flow through to chat, clips, the Story Brief, quote sheets, and exports.
07Correcting the Transcript
Transcripts are good, not perfect. A name spelled wrong, a word the engine skipped, two speakers run into one paragraph, or a line credited to the wrong person used to mean living with it or re-transcribing. Now you fix it in place, in the Transcript tab, without touching the media.
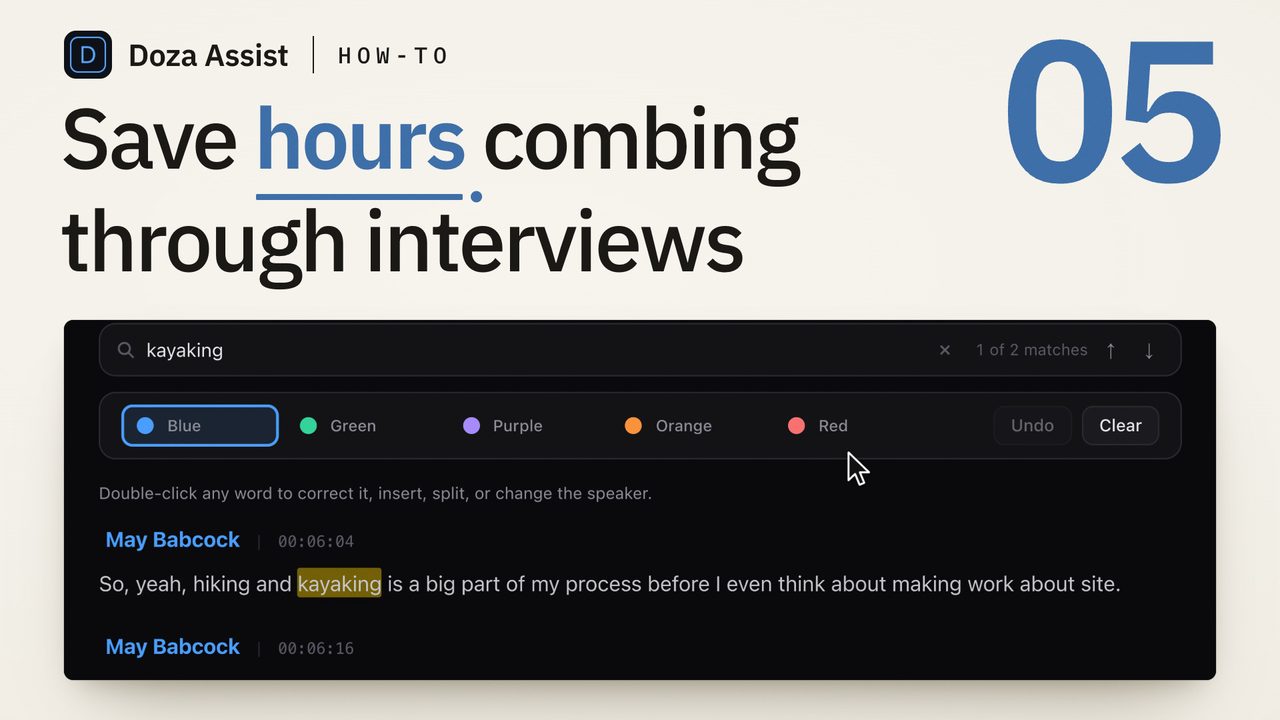
- Edit a word. Double-click it. A small box opens on the word; type the correction and press Enter. Escape cancels. The transcript, the paragraph and every clip that covers that moment show the new wording.
- Insert a word the engine missed. Double-click the word before the gap, click Insert after, type the missing word, press Enter.
- Split a paragraph. Double-click the first word of the new part and click Split here. A picker asks who the new part belongs to: keep the same speaker, pick any speaker already in the interview (shown by name), or New speaker. Rename a new speaker in the Speakers panel as usual.
- Give a segment a different speaker. Double-click any word in it and click Speaker. The same picker opens. This works on interviews where speaker identification has already run, and a speaker you assign by hand survives a later re-run.
- Undo. Cmd+Z steps back one correction at a time, on its own stack, separate from the Undo button for color labels. Undoing everything returns the transcript to exactly what it was.
When the analysis is behind. After a correction a line above the transcript says the transcript was edited since the last analysis, with a Re-run button. Nothing re-runs on its own; Chat sees the corrected wording straight away. A single click on a word still jumps the player there; only a double-click opens the editor, and it never starts playback.
08AI Analysis
AI Analysis reads the whole transcript and produces a structured story breakdown so you don't have to hunt through hours of footage. Open the AI Analysis tab and click Run Analysis (a few minutes). It produces:
- Title and Summary: a suggested headline and a plain-language overview of the interview.
- Soundbites: the strongest quotes, each with a short "why this works."
- Story Beats: the narrative structure, labeled and described moments in arc order.
- Social Clips: short, punchy moments with a suggested platform.
- Themes and B-roll cues: recurring ideas and coverage suggestions.
Every soundbite, story beat and social clip reads like a clip: a short title, the first line of what is said, and Show text to read the whole passage. Each has a play/scrub control and a + Clip button to send it to your Clip Library; Add All Clips grabs everything, and each section has its own FCPX export. Results save to disk, so you only pay the processing cost once per project per model, and a re-run on an unchanged transcript returns instantly.
On long interviews the model keeps its place from one chunk to the next instead of re-reading, so analysis is faster than it was, and if another analysis is already running the tab says which one it is waiting for and how far along that one is. After you correct the transcript (Section 7), a line above it offers a Re-run; nothing re-runs on its own.
09My Style (Editorial DNA)
This is what makes Doza Assist different from every other tool in the category. My Style learns how you cut. You feed it your finished projects, the docs and reels you're proud of, and it learns what you reach for: the emotional beats you favor, the structures you return to, the way you find a thread in raw interview and pull it into something that moves people.
Creating a style profile
- Open My Style from the header and click + New profile. Name it for the kind of work, like "Doc Style," "Social Cuts," or "Corporate Testimonials."
- Feed it 3 to 5 finished pieces: drop FCPXML exports (it reads only the dialogue that survived your cut), video/audio files, or a whole folder.
- The app analyzes your patterns (pacing, beat structure, transitions, how you open and close) and builds the profile.
- Toggle Style on (the pill near the chat input) to apply your editorial voice to analysis, chat, story drafts, and quote selection.
10AI Chat
Chat is your conversational way into the footage. It knows this interview end to end, your AI Analysis, your color-labeled selects and your speaker names, so you can talk to it the way you would talk to an assistant editor who watched everything and saw what you flagged. It tells the difference between a question and a request for clips, answers in plain words, and thinks like an editor sitting next to you.
It looks like a normal chat. One box, five suggested questions to start, nothing else on screen until you ask. The suggestions are about finding the story ("What's the story here?", "Where does this interview turn?", "Pull the strongest soundbites", "What are the major themes?"); once you have pulled clips they turn toward your cut ("What am I missing?", "Suggest a running order"). Three follow-up questions appear under every answer; click one to ask it.
It reads the whole interview, however long it is. Every question gets a real answer in plain words, with playable clips inside it where they belong. On a 3½-hour interview an answer arrives in about 20 seconds. Answers are short and specific: a few sentences from a sharp editor, then the clips that back it up.
Every clip in an answer is a card you can use. Play it in place, read its words, add it to Clips with one click, or pull all of them at once. Build as Story turns an answer into a Story Builder sequence. Hover a card to park the player on that moment before you press play.
It knows when not to give clips. Say "no clips" or "just tell me" and you get prose only. Ask something the footage does not cover and it says so. Ask what someone actually said about a topic and it answers with their verbatim words and timecodes, never a paraphrase from memory.
It remembers. Tell it what you are making ("a 90-second teaser", "a four-minute recruiting film") and every later answer keeps that in mind. Click ✕ on any clip card to pass on that moment; it will not come back in later answers, and you can restore it any time. Durations are a real spec: ask for "a 60-second cut" and the selects land close to that length; "keep it under two minutes" is enforced, and shorthand like "90s" or "2min" works.
With My Style on, Chat shapes which moments it picks to how you actually build sequences, not only how it talks. Use Clear to wipe a project's chat history.
11Story Brief
Story Brief is a deeper, producer-level read of the project than AI Analysis. It helps you decide how to cut, not just what. Open the Story Brief tab, next to Chat, and click Create Story Brief (~2 to 5 minutes). It reads Arcs / Tensions / Coverage, shows when it was built and with which style profile, and asks before rebuilding. You get:
- Recommended story arcs and structures for the material.
- Tensions and contradictions worth building around.
- Strongest moments, surfaced and explained.
- Cross-speaker connections and a speaker map (when there are multiple speakers).
- Coverage gaps: what's thin, with suggested follow-up questions.
Each moment names its real speaker and opens a word-for-word transcript; one click adds a single moment to your Clips, and Send to Story Builder hands it to a story. Re-run anytime with Rebuild; the brief never replaces a good brief with an empty one. Story Brief uses the flagship analysis model (Opus 4.8 or GPT-5.4 on a cloud key).
12Story Builder
Where Chat answers questions, Story Builder drafts sequences. Type the story you want in plain English, like "Build me a 3-minute story about her journey from athlete to coach," then click Build, and the app assembles an ordered sequence of moments into a vertical timeline you can Play All, rearrange, Add All to Clips, or export. Drag clips in from Your Clips on the left to add your own selects to a story; rename or delete stories in the Stories list, or start another with + Story. Finished sequences also export straight from the Export tab, named "Project – Story: Title".
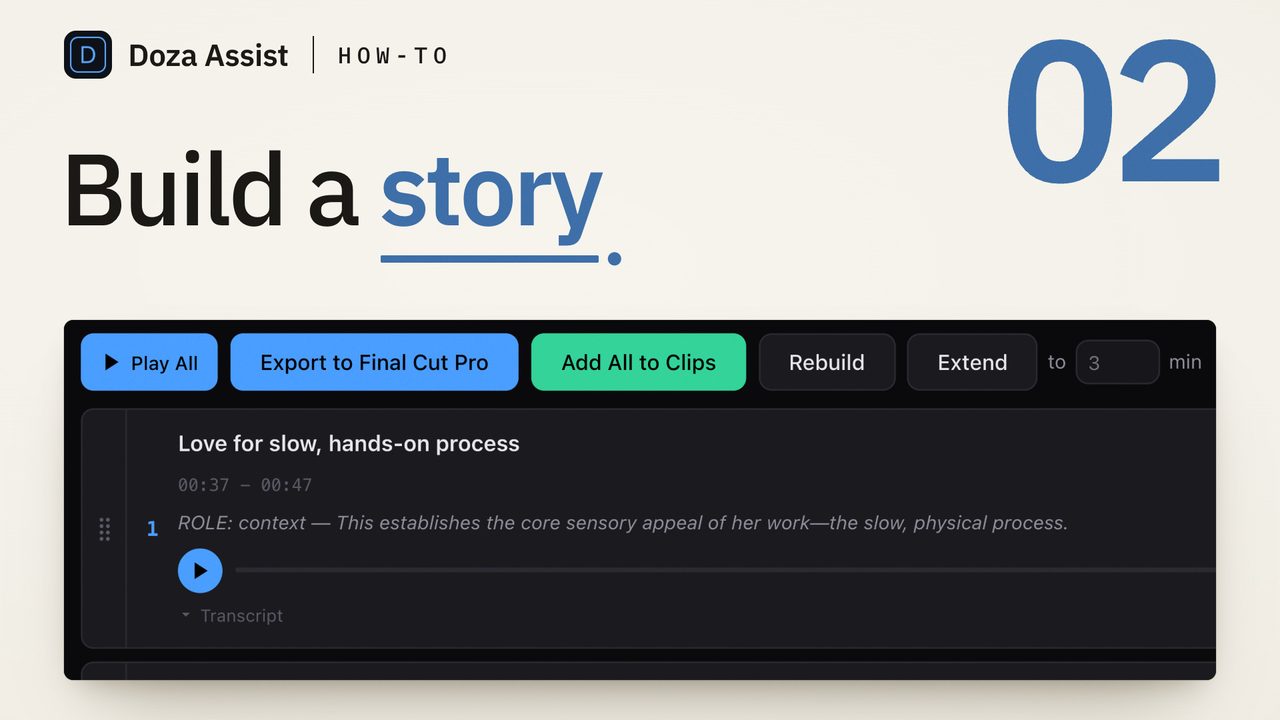
Think of it as your rough-cut assistant: it does the first pass the way you would, then hands you a sequence to refine. With My Style on, the result reflects how you actually work, not highlights ranked by engagement.
Duration requests are honored as build targets: ask for a 3-minute story and the sequence assembles to roughly three minutes — not a highlight reel half that length — and "under 90 seconds" style ceilings are respected.
13Clips & Color Labeling
Color-label highlighter
On the Transcript tab, mark the best moments by painting transcript text with colored highlighters. Pick a color (Blue, Green, Purple, Orange, Red) from the toolbar, each renamable ("Soundbite," "B-roll cue," whatever fits your system), and drag across the words to label them. Clips start and end on the word, with sub-second precision, so a clip never opens a beat early on the tail of the previous sentence. Undo and Clear are in the toolbar. Every labeled span becomes a clip.
Clip Library
The Clips tab gathers every clip you have collected, from transcript labels, AI Analysis, Chat, the Story Brief or a connected assistant, in a grid or list. Every clip carries a short generated title, the first line of what is said under it, and Show text to read the whole passage; cards show seconds, not a rounded minute. Select all or none, play each, filter by color on the one-line toolbar, and Export your selection. Drag the grip on any card to put clips in the order you want; your manual order carries through to every export. The Quote Sheet controls also live here (Section 14). Your color tags carry through to the FCPXML export as markers or keywords in your NLE.
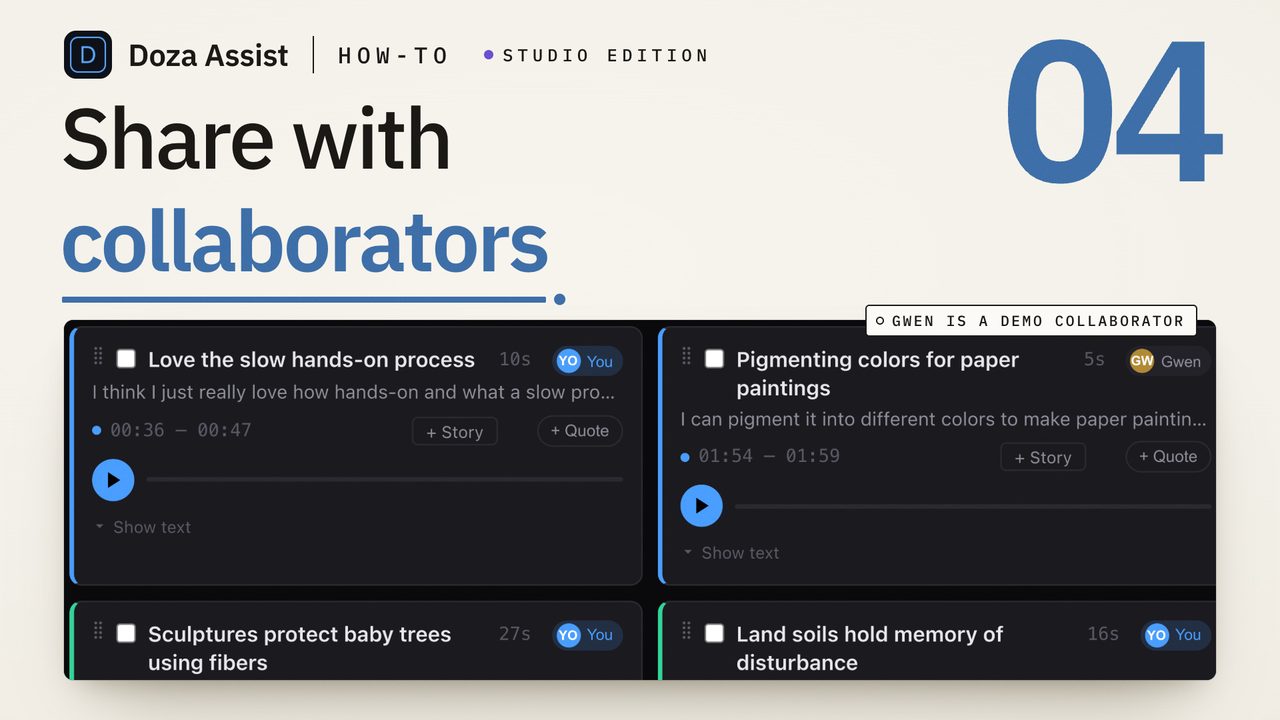
Studio Selects and comments from share-link collaborators land here too, each card carrying the collaborator's name. Filter by Me or Agreed, and export a Selects Stringout of everyone's picks (Section 19).
Trim a clip one word at a time
The Trim button on a clip opens a trim sheet: the words around the clip with in and out handles. Drag a handle, click a word, or nudge with the arrow keys, and the clip snaps to word boundaries. Audition the new edge in place. Trimming changes the clip's in and out points only; the words themselves are never touched.
14Quote Sheets
Quote Sheets turn an interview into a polished, press-ready document: featured, cleaned quotes grouped by speaker and topic, plus a full Q&A index of the whole recording with timecodes. Built for media relations, post-game pressers, earnings calls, and panels. Exports to PDF or DOCX.
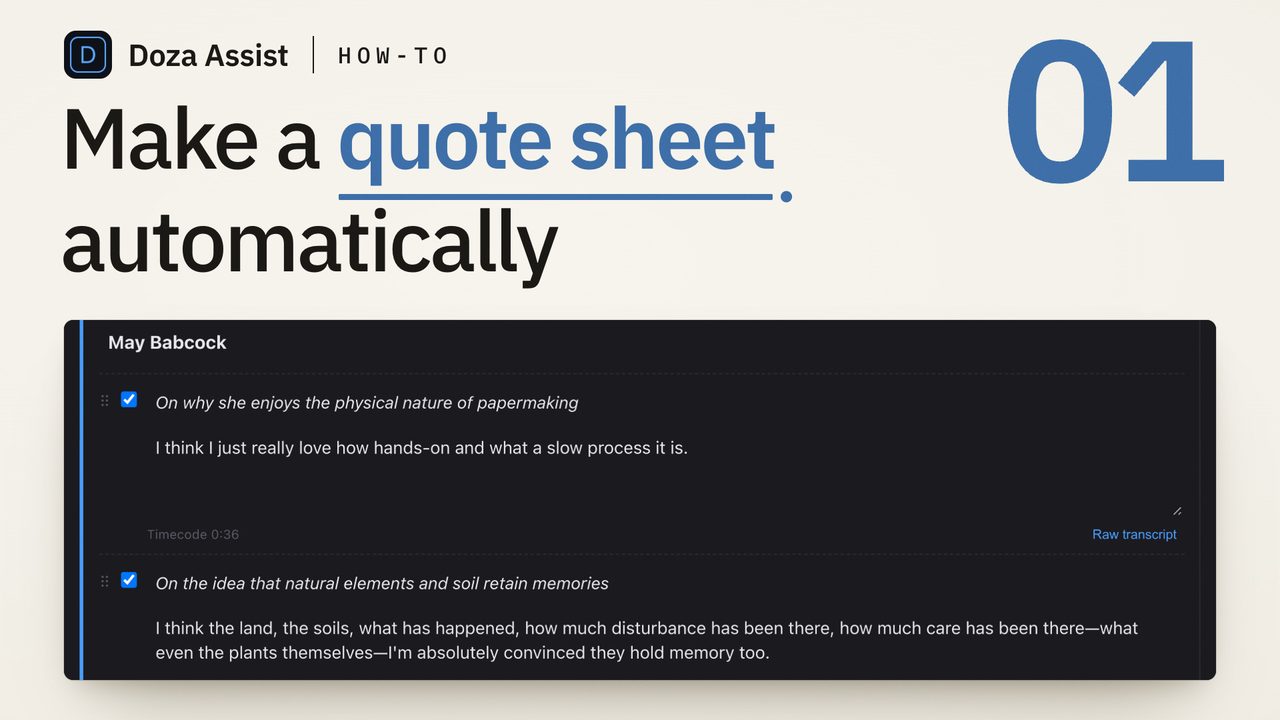
Generating a quote sheet
- On the Clips tab toolbar, open the Quote Sheet dropdown and choose Auto Generate (AI scans the whole transcript and picks the best quotes) or From Tagged Clips (only your tagged windows). Tip: pre-tag candidates with + Quote on Clip Library cards.
- The Quote Sheet Editor opens with an AI draft: speakers, topic headers, and cleaned quotes. Edit inline, drag to reorder, and tick checkboxes to include or exclude each quote.
- Promote any topic from the Q&A index up into the featured section (it gets AI-cleaned), or unpromote it.
- Set Event Metadata (an Event title is required): organization and logo, date / location / type, contact details, and a distribution notice such as "FOR IMMEDIATE RELEASE." Tick Save as default to reuse your org and contact block on future projects.
- Export from the footer: Export PDF or Export DOCX. A Versions menu keeps your last 10 drafts.
The finished sheet matches the press format comms teams send out: event header, then date/location, then Featured quotes (bold name and role, italic "On [topic]," the verbatim quote as a clean paragraph), then a Full Q&A Index with time ranges, then distribution notice and contact block. The previous branded layout is one setting away. The project must be transcribed first.
Studio On a share link, the same quote sheet, transcript and selects appear under a Documents tab for collaborators to download (Section 19).
15Collections: Several Interviews as One Project
A collection is two or more interviews filed together: the founder and the investor, the three people in one campaign, the whole day of a shoot. A collection has the same page as a single interview, and every tab works across all of its interviews at once. The story you are looking for usually lives between interviews, and the whole app looks there with you.
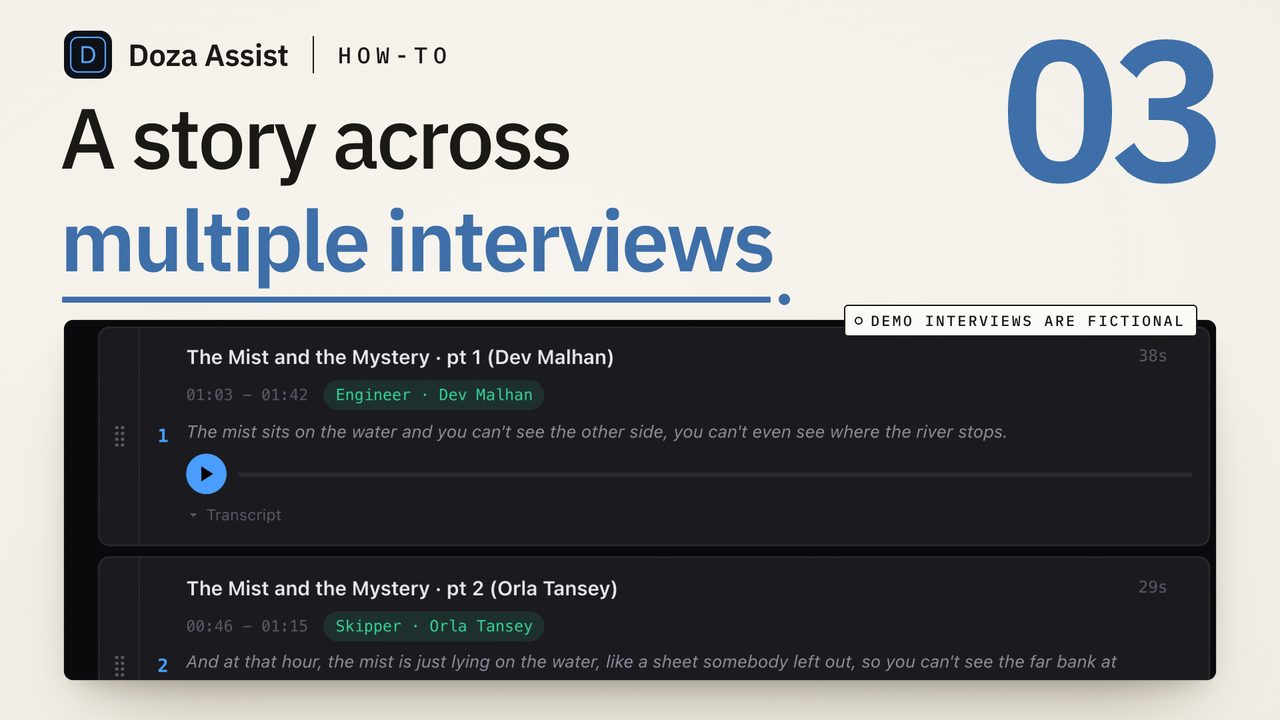
- Create one from the Projects page. Every transcribed interview has a checkbox. Check two or more, click Create Collection, give it a name, and the interviews are filed together and the collection starts building. Dragging projects into a folder still works. Add an interview later and the collection picks it up.
- Same tabs, same order. Transcript, Chat, Story Brief, Story Builder, Clips, Export. There is no separate dashboard; everything it used to show lives on the Story Brief tab.
- Transcript. The same player as a project, video or waveform; switch between interviews with one click; the same color-label toolbar and the same Speakers panel, with colored rows you can rename.
- Chat across every interview. The same five story-first questions, live answers, and clip cards that can come from any interview, each naming its interview and speaker. Story So Far, follow-up questions and "no clips" all work here.
- Story Brief across interviews. Arcs, tensions, strongest moments, the connections between interviews, speakers and coverage, each moment labelled with the interview it comes from. Rebuild it whenever an interview changes.
- Story Builder, Clips and Export draw from every interview. Exports are named "Collection – Selects 1" and numbered; Documents get a section per interview; the frame rate defaults to Auto so 29.97 media stays on its own grid.
- Settings. The gear menu offers Collection details, Output Language, AI Model, Delete collection, and AI assistant access for every interview in the collection at once.
Speaker names found in an interview flow into the collection's transcript, chat answers, Story Brief and exports. Every citation the AI makes is checked against your real projects, so an invented name or timecode is dropped automatically.
16AI Assistant Access: a Connector for Claude (MCP)
Your projects can be read by an AI assistant you already use, such as Claude. Your media files never leave your Mac; the transcript text and selects of the projects you switch on do go to that assistant, which is a cloud service.
Studio Collaborators on a share link can do the same with their own assistant when you switch on "Collaborators can use their own AI" for that link (Section 19).
- Per project, off by default. On the project page, open the gear menu and choose AI assistant access. Only projects you switch on are visible to a connected assistant; everything else stays invisible. On a collection page the same item switches every interview in the collection on or off at once.
- Add it to Claude Desktop with one click. The panel's Add to Claude Desktop button hands Claude Desktop the connector; Claude asks you to confirm, and Doza Assist appears in its connector list with the Doza Assist logo. No config files, no restart. Then ask Claude: "list my Doza projects".
- Other assistants. Claude Code, Cursor and VS Code connect with the command and config shown under Other assistants in the same panel. ChatGPT cannot connect in this version.
What a connected assistant can do: list the projects you have switched on; read a project's transcript with timecodes and speakers; search a transcript; see the selects in the Clip Library; add its own selects, clearly labeled "AI assistant" so you always know which are yours (they appear in the open project within seconds, with a toast and a View button); and build a selects stringout you can open in your editor. What it cannot do: delete or change your clips, see your media files, see projects you have not switched on, or read your My Style profiles.
17FCPXML & Multicam Round-Trip
If you already work in Final Cut Pro or DaVinci Resolve, FCPXML is the fastest way in and out of Doza Assist. A small XML file carries your timeline structure, sync relationships, and multicam metadata with zero media movement.
Importing a multicam or sync-clip project
Drop an .fcpxml file or .fcpxmld bundle onto the dashboard (from Final Cut or from a Resolve export). Doza Assist reads the multicam or sync-clip spine, finds the active audio angle for each segment, and transcribes it. Mixed timelines are supported, for example two interview multicams plus pick-up sync-clips. When there are several audio sources, the app builds a single timeline-aligned transcript so the words you click line up with the sequence; muted segments stay silent, matching Final Cut playback.
Straight from the browser — no timeline needed. You do not have to build a scratch sequence first: select one or more multicam clips right in the Final Cut browser, choose File › Export XML, and drop the export in. Doza Assist builds the working sequence internally. If the export holds several multicam clips, a chooser lists them and each checked clip becomes its own project, named after the clip — the Import Queue does the same, one row per clip.
Round-trip: sending selects back
On an FCPXML-imported project, the Export tab offers FCPXML Round-Trip Export. Choose what to include (My Clips, AI Social Clips, Story Beats, Soundbites), confirm the framerate, and pick an output mode:
- New Project (Mode A): a fresh timeline with one clip per select, landing on the same multicam angles with video and audio sync intact (it reuses the original project's media references), with the speaker name carried in each clip's note.
- Markers (Mode B): your original timeline with a marker dropped at each select's in-point; the marker style encodes the select type.
Round-trip export is built for Final Cut Pro and imports cleanly there. Sending a round-tripped project to a different NLE isn't supported — the app tells you so rather than producing a broken timeline — because the rebuilt multicam structure only reconstructs correctly in Final Cut. (For other editors, use a normal export instead; see Section 18.) Because Doza Assist reads each clip's embedded source timecode, footage from cameras that stamp time-of-day or broadcast timecode (DJI, Sony, MXF, and similar) round-trips to the right spot. If a select can't be placed on the timeline, the export tells you which one instead of silently dropping it.
18Exporting to Your NLE
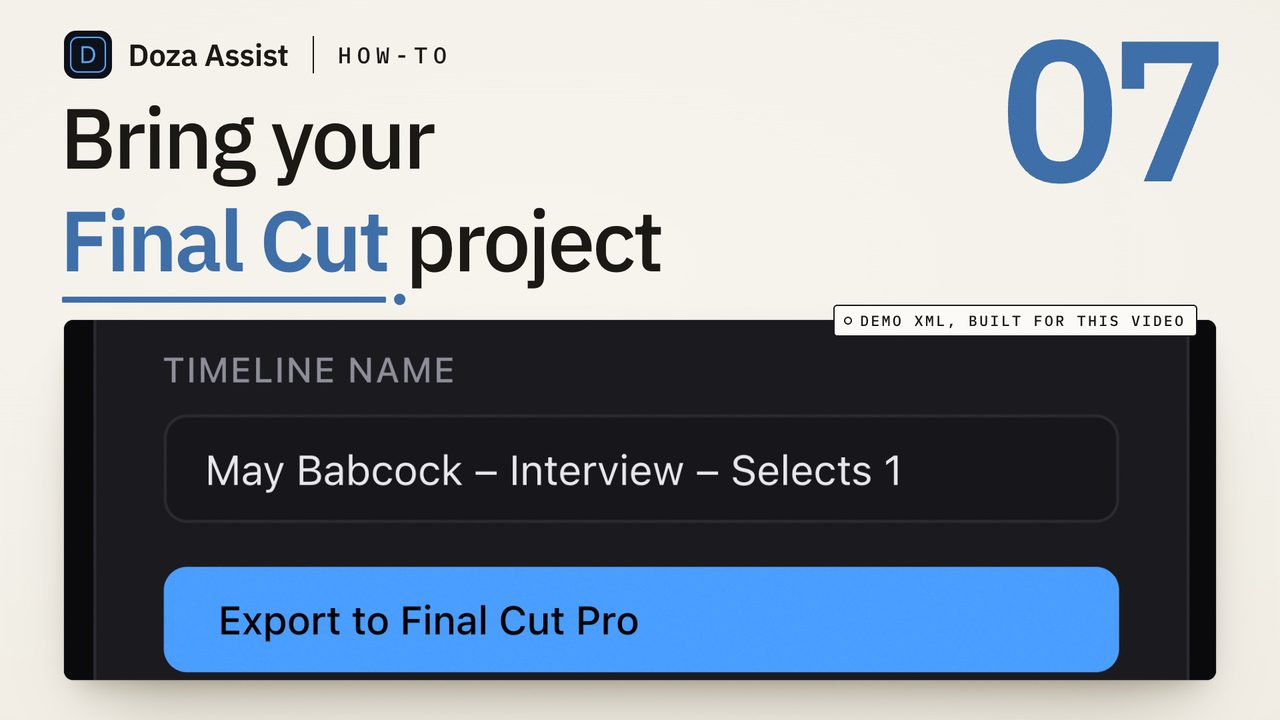
Doza Assist exports via FCPXML, the interchange format used across professional editing. A few-kilobyte XML file replaces gigabytes of rendered media. It references your original source files in place. On the Export tab, choose what to include, set your Framerate and Export Mode (Pre-cut Timeline, Cuts + Markers, or Markers Only), and export.
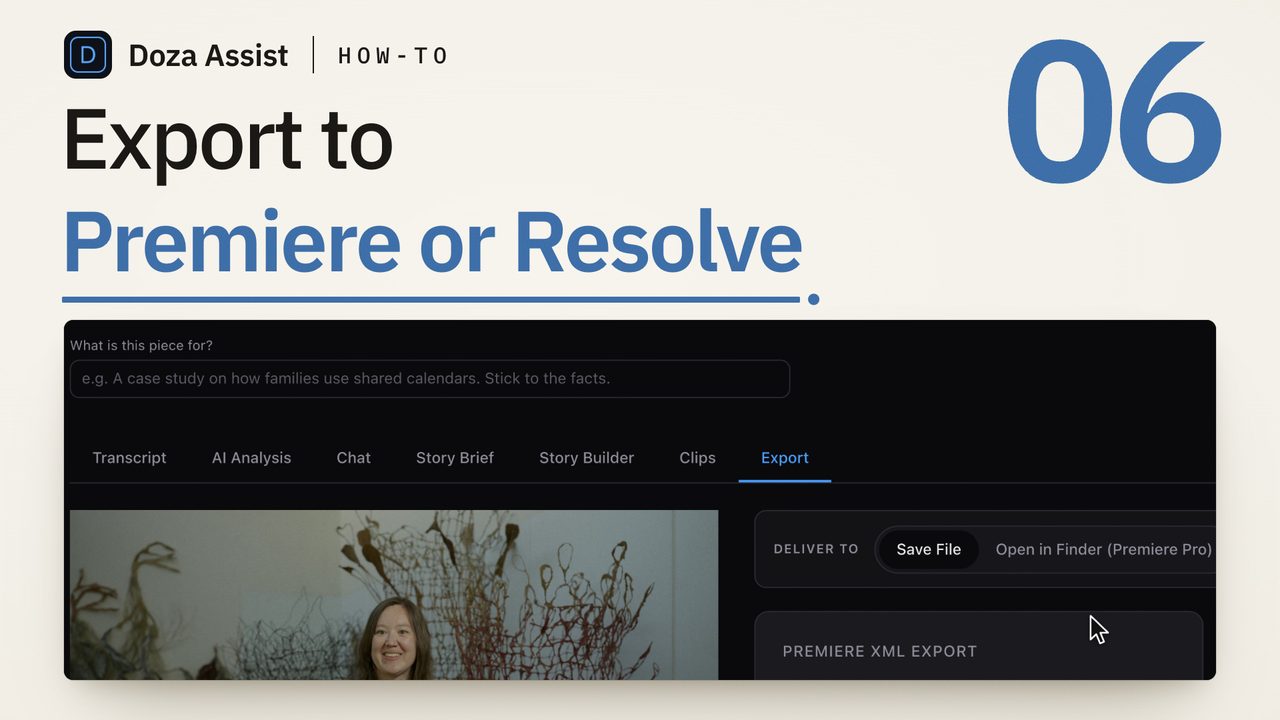
Named the way you will look for them. Every timeline arrives named for the project and what it is: "Project – Selects 1", "Project – Markers 1", "Project – Story: Title". The number counts up per project, so re-exports never pile onto one name, and the file carries the same name. A Timeline name field lets you type a different name before you send. Round-trip exports keep your original event.
Every exported clip carries its transcript. In Final Cut, the clip's Notes field holds the title and speaker, then the exact words for that range, speaker by speaker, so you can read a select without playing it. Transcript corrections travel too: the note shows the corrected words on the original timecodes. Clips are tagged with one "Doza Assist" keyword for filtering. Story Builder sequences export straight from this tab as well.
Where it goes: Deliver to
- Save File: writes the file and reveals it in Finder.
- Send to [NLE]: finds your editor on the Mac and hands off the file directly.
| Your NLE | Format | Hand-off |
|---|---|---|
| Final Cut Pro | FCPXML | Auto-imports as a new event. Clips, keywords, and markers intact. The tightest round-trip. |
| DaVinci Resolve | FCPXML (also EDL / FCP7 XML) | Auto-imports the timeline. Strong FCPXML support. |
| Adobe Premiere Pro | Premiere XML | Reveals the file in Finder for File > Import. Selects and timecodes transfer cleanly. |
Multi-track source audio. When your media carries multiple audio tracks (for example a broadcast MXF with mics on separate channels), the FCPXML declares the full audio layout so every track comes across — clips no longer arrive silent in Resolve — and routes the spoken-dialogue channel so the voice plays on import instead of an empty track.
Relinking: keep your original source media at the same file paths. FCPXML references media by path, not by embedding it.
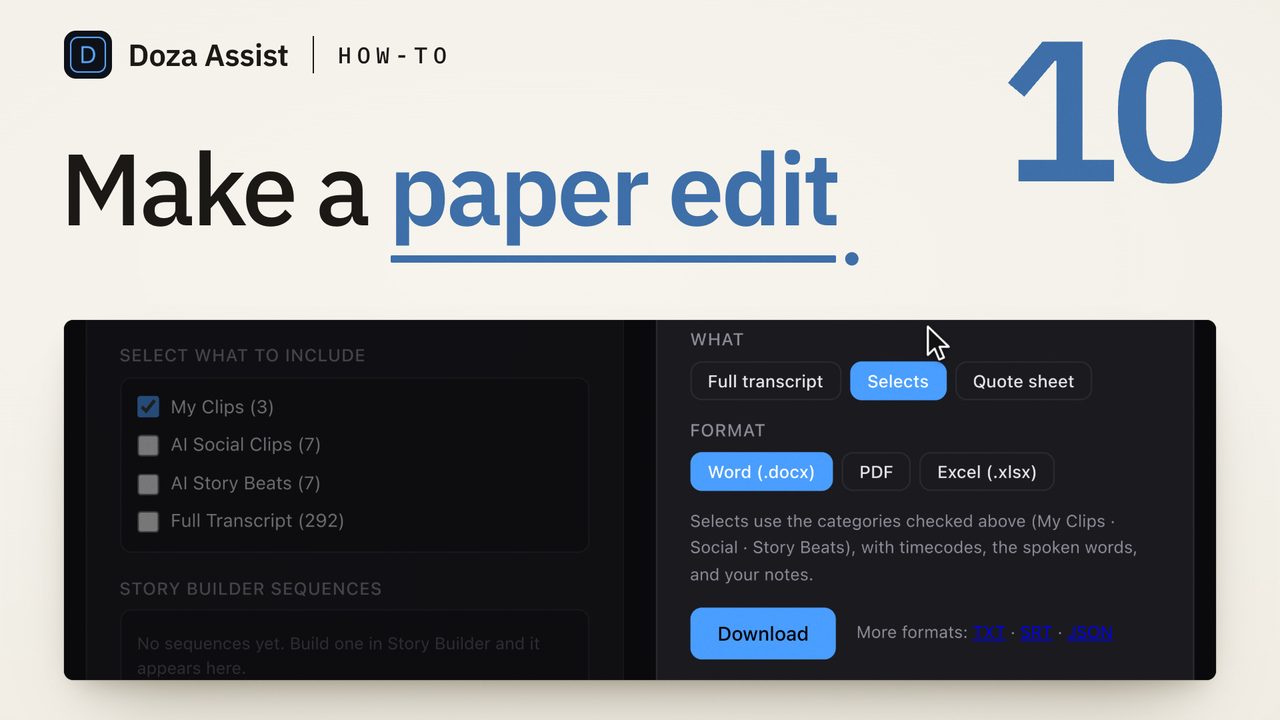
Documents. A separate card on the Export tab writes the transcript, your selects or a quote sheet as Word, PDF or Excel, and the transcript on its own as Plain Text, SRT, or JSON.
19Studio: Share With Collaborators Studio
Share is the one thing Doza Assist (Studio) has that Doza Assist does not. It publishes an interview, or a whole collection, to a private link on share.doza.ai. A producer, a client or a second editor opens the link in any browser, with nothing to install and no account, and works the interview: word-level playback, speaker labels, search, highlights, selects with a note, comments. Everything they pull syncs back into your project, attributed to whoever made it, ready for the timeline. Your video never uploads; the link carries a compressed audio track, the transcript and the review page built from them.
Publish a share link
- Open the Studio panel. On a transcribed project, click Share. The panel lists what uploads: a compressed audio track, the transcript and the review page built from them (analysis, labeled clips, the quote sheet). With Include documents on (the default), the Word, PDF and Excel documents upload too. The video stays on your Mac.
- Create the link. Click Create share link. When the upload finishes the panel shows the link with Copy link. Before you create it, you can type a name in the box beside the button; the name shows on the collaborator’s page. Each interview has one link.
- Send it. Paste the link into an email or a message. Anyone with it can view the transcript and mark selects; add a passcode (below) for sensitive material.
Link settings
Every switch is per link, and each can be changed after publishing.
| Setting | What it does | Default |
|---|---|---|
| Passcode | A second factor, 4 to 24 characters, that you send separately from the link. Add passcode, Copy passcode, Remove. | Off |
| Collaborators can use their own AI | Lets a collaborator connect the link to their own assistant (Claude and other MCP clients) to search the interview and pull clips. Off means the page is local-only for them. | Off |
| Include documents | Adds a Documents tab to the link: the transcript, your selects and the quote sheet as Word, PDF and Excel, the same files the Export tab makes (Section 14). Switching it off removes the tab and its files; a quote sheet you’ve made can still be downloaded as PDF or Word from the link. | On |
| Auto-sync | Checks the link for new selects and comments while the project is open, every 30 seconds by default. Sync now pulls immediately. | On |
What a collaborator sees
The link opens a review page: the audio with word-level playback, the transcript with your speaker names, search, and whatever analysis, labeled clips and quote sheet you published. On first open the page asks for a name (email optional) so you know who marked what. To mark a select they drag across the transcript, add a short "why this moment" note, and save. Comments go in the Comments panel beside the transcript, pinned to the playback time. With Documents on, a Documents tab offers the transcript, selects and quote sheet as downloads. If Studio is paused, the page turns view-only and says so; an expired link no longer opens.
Selects come back to you
Collaborator selects and comments arrive in the Clips tab (Section 13) with a name pill on each card and a toast in the app ("3 new selects from Maria"). Filter by Me or Agreed; two selects count as Agreed when they overlap by at least half of the shorter one (adjustable in Settings). Reply to a comment from the card. The Export tab gains a Selects Stringout: one timeline of every collaborator's selects, each marked with who chose it and why. Choose whom to include (all collaborators, chosen names, agreed only), the order (timecode, grouped by collaborator, collaborator order) and handles, then import it into Final Cut Pro or DaVinci Resolve.
Expire, extend, retention
A link expires 90 days after the last activity (30 to 365 in Settings); Doza Assist deletes it the next time you open the project after that date. The panel warns at 14 days and again at 3, and Extend 90 days resets the clock. Expire link ends it now: collaborators lose access and the cloud copy of the audio, transcript, selects and comments is deleted. Your local project is never touched; anything already synced stays in Clips.
Sharing a collection
Publish a collection with Share collection on its collection page (Section 15) and collaborators get a dashboard listing every interview in it, each with its own review page. One link covers the whole shoot. Collection links have no passcode, AI or documents switches and don’t expire on their own; bring collaborators’ work in with Pull collection feedback and take the link down with Unpublish.
Studio settings
Settings → Studio holds the per-Mac defaults: the auto-sync interval, the Agreed threshold, share link retention, and AI assistant access for your own assistant (Section 16).
The free trial, and when a subscription ends
Doza Assist (Studio) runs as a free trial with everything in the Doza Assist trial plus two share links per Mac, with every Share feature. The panel counts them ("1 of 2 share links used"); a Studio key removes the limit. If a subscription lapses, links you already sent stay online read-only and you can’t publish or sync new work until you renew; nothing local is lost. Studio keys run on one Mac at a time.
20Practical Tips
- Plug in your Mac for analysis runs. Battery mode throttles GPU performance and can double processing time.
- Fix the transcript before analyzing. Name the speakers, double-click any wrong word, split run-on paragraphs. Bad labels and misheard names propagate into every downstream step; five minutes of cleanup saves a re-run.
- Ask Chat the five suggested questions first. They are the questions an editor asks on day one, and the answers come with clips you can use straight away.
- Start with local 4B as your default; climb to 26B or 31B (or a cloud key) for final client deliverables.
- Connect a cloud key for hero work. Opus 4.8 and GPT-5.4 give the sharpest writing and the fastest turnaround for a few cents per interview. Every project starts local. Nothing leaves your Mac until you say so, per project: switch a project to a cloud provider in its gear menu and confirm the dialog.
- Use My Style selectively. Off while exploring; on once you know the story you're chasing.
- FCPXML import is the fastest way in. If you're already in FCP or Resolve, import the timeline instead of re-importing raw media.
- Analysis saves to disk. Closing and reopening the app never loses your work. Recent Activity in the sidebar is your audit trail.
21Troubleshooting
The Share panel says "Upgrade to Studio" Studio
Publishing a share link needs a Studio or Enterprise key in Doza Assist (Studio), or the Studio free trial (two links per Mac). A Doza Assist key unlocks the app but not Share. Get Studio at doza.ai/buy, then enter the key under Manage License…
A share link is read-only, or the panel says Studio is paused Studio
The subscription has lapsed. If a payment failed, update it from the Manage subscription link in your Paddle receipt and relaunch Doza Assist (Studio). If it was cancelled, subscribe again with Resume Studio (or at doza.ai/buy) and enter the new key under Manage License…. Links you already sent stay online read-only until then; an expired link is deleted and cannot be extended, so create a new one from the Studio panel. Nothing local is lost; anything already synced stays in Clips.
First-launch downloads stall or fail
First launch needs an internet connection for the model downloads. If it stalls, check your connection and relaunch the app — downloads resume where they left off. If it still won't complete, email [email protected] with what you're seeing and I'll get you running.
Model download stalls or fails
Downloads need a stable connection and enough free disk space (Section 2). If it stalls, close and reopen the app to resume.
Analysis is running very slowly
Check three things: are you plugged into power (battery throttles the GPU)? Is another heavy app competing for the GPU? Is the local model too large for your RAM (macOS then pages to disk)? Switch to a smaller model, or connect a cloud key for off-machine speed.
Cloud AI key isn't working
In AI Model, re-paste the key and click Test. Make sure it's an active key from console.anthropic.com or platform.openai.com with billing enabled. You can always switch back to free Local mode.
Speaker identification shows only one speaker, or the wrong one on a line
Very short clips or heavy crosstalk can read as one voice. Rename speakers in the Speakers panel, and give any line to the right person by double-clicking a word in it and choosing Speaker (Section 7); that assignment survives a later re-run. If speaker identification never ran, the Speakers panel offers Run speaker detection.
A line above the transcript says it was edited since the last analysis
That is expected after a correction. Soundbites, story beats and social clips still hold their timecodes; click Re-run when you want them to reflect the new wording. Chat already sees it.
Claude Desktop says the Doza Assist connector is not running
Doza Assist has to be open. While the app is still starting the connector says so and Claude retries; once the project page is up, ask again. An empty project list means no project is switched on yet: open the project's gear menu and choose AI assistant access.
The transcript repeats a phrase, or shows text for silent footage
On footage with no speech — room tone, music-only, or a silent proxy — speech engines can otherwise "hallucinate" a repeated caption. Doza Assist detects near-silent audio and returns an empty transcript instead. If you see this on footage that does contain dialogue, the wrong audio track is likely selected: open ⚙ → Retranscribe and pick the track with the voice (Section 6).
Quote Sheet won't export
A Quote Sheet needs an Event title set in Event Metadata, and the project must be transcribed first.
FCPXML won't import into my NLE
Make sure the original source media is at the same file paths it was when you imported into Doza Assist. FCPXML references media by path. Restore moved or renamed files and try again.
The local AI engine is unresponsive
Quit Doza Assist completely and relaunch — the app runs its own bundled engine and supervises it, restarting it automatically if it crashes. If analysis errors persist, open Activity Monitor, quit any lingering "ollama" process, and relaunch the app. There is nothing to reinstall; the engine ships inside Doza Assist.
Doza Assist — the workflow above, on your Mac, with a 30-day money-back guarantee.
Free trial: every feature on your first 2 minutes — no account, no card · 30-day money-back guarantee · Requires a Mac with Apple Silicon (M1 or later)